
1. How to license Users in Microsoft 365 admin area#
New users can be added from the Microsoft 365 admin portal, yours can be accessed via this link:
https://admin.microsoft.com/Adminportal#/users
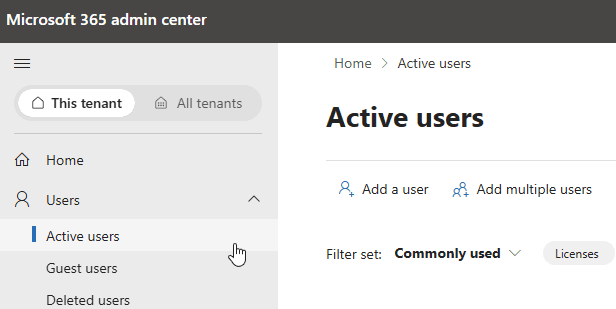
To add new users one at a time, please follow the steps here:
Add users and assign licenses in Microsoft 365
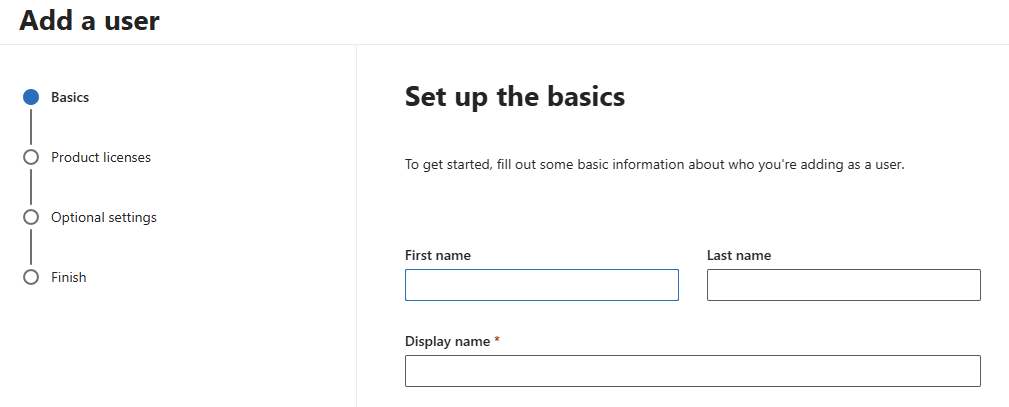
To add multiple users at one time, please follow the steps here:
Add mulitple users and assign licenses in Microsoft 365
2. How to configure Users in Microsoft 365 admin area#
In order for a User to sync to and access Pump, they must be assigned a 'Dynamics 365 Sales Enterprise' license (or variation of this) within your Microsoft 365 admin portal.
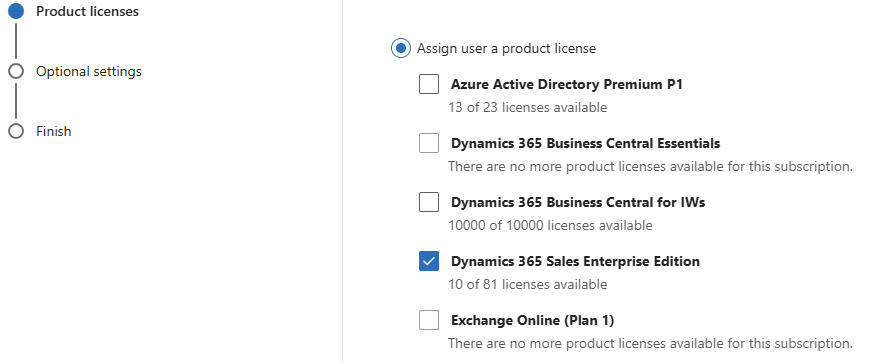
Additionally, for full functionality, they will also require a Microsoft 365 license that includes Exchange / email and Outlook application rights.
To assign licenses to one user at a time, please following the steps here:
To assign licenses to multiple users at one time, please follow the steps here:
Assign licenses to multiple users in the Microsoft 365 admin center
3. How to configure User Personal Settings#
❗Please note: It is vital that users Personal Settings are configured correctly before a user starts using Pump.
Personalization settings can be set individually, by each user or in bulk by an Administrator.
For a user to do this individually navigate to Settings (top-right cog icon), then click 'Personal Settings': (to open the Set Personal Options Dialog).
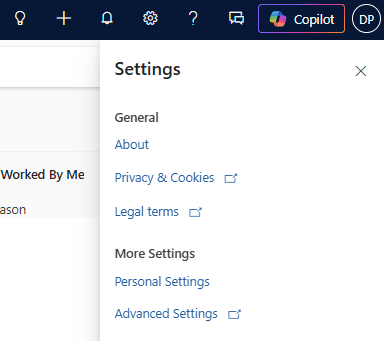
Switch to 'classic' mode:
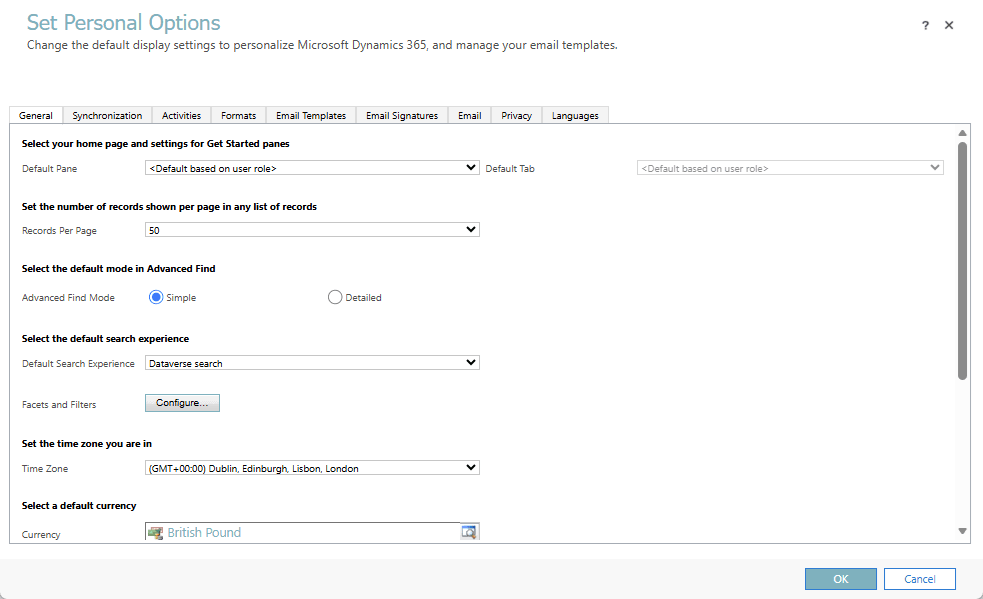
Our recommended Personalization Settings can be found here:
If you wish to know more about Personal Settings please see the information from Microsoft here: Set personal options
Updating user personal settings in bulk #
When there is a need to update multiple users to all have the same personal settings, use the User Settings Utility tool in XRMToolbox. Although this tool is not supported by ourselves or Microsoft it is a reliable way of managing this for multiple users.
Please note that the tool does not allow you to manage email signatures for users.
Updating user sync filters in bulk #
When there is a need to update multiple users to all have the same record filters for the synchronization of data to Outlook, use the Sync Filter Manager tool in XRMToolbox. Although this tool is not supported by ourselves or Microsoft it is Microsoft's recommended way of managing this for multiple users.
Please note that Users can also change their Sync filters via their Personal Settings.
For instructions on how to use the XRMToolbox to do this please see the Microsoft information here:
Set up default sync filters for multiple users for appointments, contacts, or tasks
4. How to assign a User Business Unit, Teams and Security Roles#
Once you have applied the Microsoft licenses to a user in your Microsoft 365 admin portal, log into the Power Platform instance to configure the user.
❗Please note: You must do this separately for both the Sandbox and Production instances.
Find out more about the advice below here:
Setting Up a User Record #
To access the User Record for setting up, go to Advanced Settings (top-right cog) > Security > Users, then open the relevant User Record in the list and check the following:
Business Unit and Teams#
Add each user to their appropriate Business Unit. If you only have one Business Unit, they should still be added to it.
A primary team must be selected for each User. This is set in the ‘Primary Team’ lookup field on the User record. This enables you to filter data on Views by the Primary Team as you cannot filter by multiple Teams on a single View.
Each user can also be added as a member of any other relevant Teams in the Teams Information list. Please note, as you create new Teams, each Team must belong to a Business Unit.
❗Please note: A Default Team is created for each Business Unit and all members of that Business Unit are automatically added to that Default Team. We hide this association from our default Views. You must create new Teams and add the user's to those Teams for our default Views to work as expected.
Security Roles #
The User must have the correct Security Roles selected; check these by pressing the Manage Roles button in the ribbon menu on the User record on and ensure that relevant Security Roles are selected:
You can manage and customise your Security Roles directly in Production, or if you wish to manage them via the release cycle you can add them to your Sandbox Unmanaged Solution and customise them as you wish.
Pump Security Roles are prefixed with ‘Pump - ...'. A full list of our out of the box Security Roles can be found here: Pump Security Roles
Custom Security Roles are prefixed with the name of your business.
Ensure the Security Role used by all of your users is assigned to your Pump app on each instance so they are able to log in. 'Pump - Recruiter' is assigned by default. Please find out more here: Add custom Security Roles to your model-driven apps
The Administrator Security Role is 'System Administrator'. If you just wish for a user to customise but not administrate the system please use 'System Customizer'.
❗Please note: Be aware if you apply multiple Security Roles - the roles with greater Privileges will supersede a role with the equivalent restricted Privileges.
Standard Security Roles Setup #
Your Product Owner and System Administrator(s) will be set up with all the Security Roles listed above within your Sandbox and Production instance EXCEPT for the following:
SMS Access
5. How to add users to Column Security Profiles#
Ensure the User can edit or access the fields they need for their role by adding them to the correct Column Security Profiles in the Sandbox and Production instances.
❗Please note: Column Security Profiles may also be referred to as Field Security Profiles.
Find out how to create, edit and manage Column Security Profiles here:
Column-level security to control access
Each User can be added individually to the profiles or the Teams that the users are assigned to can be added instead.
Please note: All users must be added to the Column Security Profile 'Pump User' for the Pump application to work (additional Security Roles may also required for different levels of access).
To assign users to the 'Pump User' profile, follow these steps:
Access the Column Security Profile area by going to go the Power Platform Admin Portal and selecting the appropriate instance (Sandbox or Production). Then select Settings > Users + permissions and click on Column Security Profiles.
Select the 'Pump User' Column Security Profile, and add then click either the Teams tab or the Users tab. From either tab click, the Add Teams / Add Users button at the top of the page.
Search for an select the Teams and/or Users that you want to provide access to the profile and then click the Add button.
❗Please note: For a column to be available to add to a Column Security Profile, you must configure the column in your Customisation Solution in your Sandbox and check the 'Field Security' box. The Custom Solution must then be released to your Production instance before the field becomes available there too.
6. How to add a user to SharePoint sites#
Each Dynamics 365 instance will have been set up with a new SharePoint Team site associated with a Microsoft 365 Group, one for your Sandbox and one for your Production.
❗Please note: We do not provide support for using SharePoint unless it is specifically agreed.
In order for users to access documents stored against a Dynamics 365 record within SharePoint they must be a member of that SharePoint site / Microsoft 365 Group and have the correct access permissions.
To add a user to a Microsoft 365 Group please follow the steps here:
Add a member to a group in the admin center
To assign a Microsoft 365 Group to a user please follow the steps here:
Add a group to a member in the admin center
By default, each SharePoint team site is part of a Microsoft 365 Group. A Microsoft 365 Group is a single permissions group that is associated with various Microsoft 365 services. This includes a SharePoint site, an instance of Planner, a mailbox, a shared calendar, and others.
Managing Microsoft 365 Group security #
When you add owners or members to the Microsoft 365 Group, they're given access to the SharePoint site along with the other group-connected services. Group owners become site owners, and group members become site members.
It's possible to manage SharePoint site permissions separately from the Microsoft 365 Group by using SharePoint groups, but we recommend against it. If you need to customise specific SharePoint group security permissions then you can do so.
Find out more here: SharePoint site permissions
7. How to configure a User's Mailbox#
Before setting up users, make sure the User has a Security Role applied, that their Personal Email Configuration Settings are correct and set up according to our Recommended Personal Settings and that the Email Server Profiles you have configured (which will be utilised) are Activated.
Synchronization Method #
Server-Side Synchronization is the preferred and supported option for organisations utilising the Pump application. Server-Side Synchronization provides direct Power Platform instance Apps-to-Email Server Synchronization. When you use Exchange, this includes bi-directional synchronization of Emails, Contacts, Tasks, and Appointments.
Supported email service configurations for server-side configuration can be found here:
Supported email service configurations for server-side synchronization
Setting Up a User's Mailbox #
To access Email configuration, go to Advanced Settings (top-right cog) -> Email Configuration > Mailboxes.
Go to the View All Mailboxes and locate the user you want to configure. A user’s mailbox will automatically appear on this list if they have the correct Microsoft 365 and Power Apps or Dynamics 365 licenses have been applied.
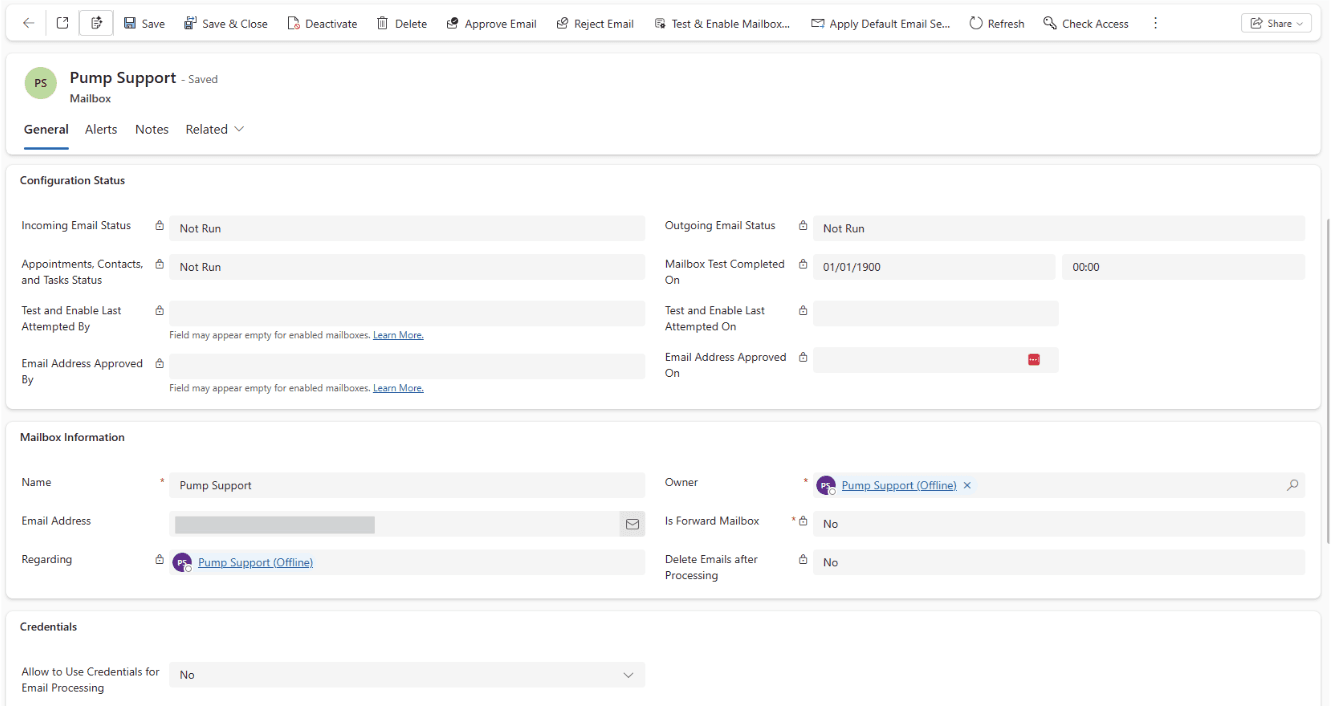
Open the Mailbox record and set the fields in the Synchronization Method section to reflect the screenshot below:

In the ribbon click Approve Email.
❗Please note: Only Microsoft 365 Global Administrators or Exchange Administrators can approve mailboxes
Click Test & Enable Mailbox
If the User’s Mailbox has been successfully enabled, you will see the following Success status in the All Mailboxes view:

8. How to install and configure Copilot for Sales in Outlook and Teams#
Administration#
Ensure that you have Copilot for Sales Outlook and Teams applications installed and accessible by all Microsoft 365 users:
Copilot for Sales deployment guide for Dynamics 365 customers | Microsoft Learn
Please ensure that all relevant users have the 'Sales Copilot User' Security Role assigned to them in your Dynamics 365 / Pump Production environment. This is a standard Microsoft provided Security Role.
Configure the Copilot for Sales via the Microsoft 365 Copilot for Sales admin settings:
Administrator settings for Copilot for Sales | Microsoft Learn
User Adoption#
1. Ensure the user understands how to access the Outlook and Teams applications:
2. Further training information can be found here:
9. How to install the Pump App for Outlook#
The Pump App for Outlook will already be installed configured in your organisation and set to be deployed to all users as standard.
Once installed, you will need to perform the following steps to enable its usage:
Give the Pump App for Outlook permission on behalf of users to access their Outlook and Dynamics 365 accounts by following the instructions on the following link: https://login.windows.net/common/oauth2/authorize?response_type=id_token&client_id=4c2ae9e3-8de0-45a5-af32-62c89132ded4&response_mode=form_post&prompt=admin_consent
In the Microsoft 365 admin portal go to https://admin.microsoft.com/ > Settings > Integrated Apps > Add-Ins and find the Pump App. Here you will be able to assign the app to specific users or to the entire organisation.
On first run, users will need to perform the following actions:
Select the Microsoft 365 account to use.
Grant the Pump App for Outlook permissions that it needs.
Select a Dynamics instance to connect to (e.g. Production).
10. How to grant access to Copilot#
Please ensure that all relevant users have the 'Sales Copilot User' Security Role assigned to them in your relevant Dynamics 365 environment. This is a standard Microsoft provided Security Role.
A step by step deployment scenario can also be found here:
Copilot for Sales deployment guide for Dynamics 365 customers | Microsoft Learn
You can find out more about installing Copilot for Sales on Outlook and Teams here:
Install Copilot for Sales (admin-deployed) | Microsoft Learn
Advice for users on accessing the application in Outlook can be found here:
Access the Copilot for Sales app | Microsoft Learn
Advice for users on accessing Copilot within Teams meetings can be found here:
Use Copilot for Sales app during a meeting | Microsoft Learn
11. How to enable ATS 360 access (Broadbean or LogicMelon)#
To enable the ATS 360 Integration to function correctly, connection settings are required to be entered in Pump Global Settings as well as the individual records of users who will use the integration.
For full instructions of how to configure the Pump ATS 360 integration, please see this page of the knowledge base:
User Settings #
1. Click on Advanced Settings (top-right cog) then select the Settings option at the top
2. Select the Security option and then select Users.
3. Open the User record you want to set up to work with the ATS 360 Integration
4. Scroll down to the Pump User Settings tab and find the ATS 360 section

5. In the Email field, enter the following depending on whether you are using Broadbean or LogicMelon
Broadbean - enter the user's 'email address' of their Broadbean user
LogicMelon - enter the user's 'username' of their LogicMelon user
6. In the ribbon menu, press the Manage Roles button.
7. Tick the Pump - ATS 360 User Security Role, then press OK.
8. Save the User record.
9. Repeat these steps for each user who will be posting Job Adverts.
12. How to configure SMS Access and Quotas#
Introduction#
This guide provides step-by-step instructions for administrators on how to configure and manage SMS quotas in Pump.
Our SMS service is powered by TextAnywhere.
Prerequisites #
Ensure you have full administrator privileges before beginning the SMS quota setup process.
The Pump SMS Access Security Role must be assigned to any user or team who needs to send SMS messages via Pump. Without this security role, SMS functionality will not be available, even if quotas are assigned.
Accessing SMS Settings #
In Pump, navigate to the bottom of the main navigation menu and select System Administration.
Click on the Master Global Settings Record option. This will open the general settings tab of Global Settings.
Switch to the SMS Settings tab.
Configuring SMS Settings#
On the SMS Settings form, you will find three key fields:
Enable SMS: Choose Yes to activate SMS functionality. If set to No, SMS features will be disabled.
Respond by Email: Select Yes if you want any replies to SMS messages to be delivered as emails to the sender's inbox. Selecting No will disable this feature.
SMS Limited By: Use this dropdown to specify whether SMS quotas will be set for Teams or Users.
Once you have configured these fields as required, ensure you save your changes.
Setting SMS Quotas#
Depending on your selection under SMS Limited By, proceed to configure quotas for either a team or a user:
If configuring for a team, select Teams from the main navigation menu and choose the relevant team.
If configuring for a user, select Users and choose the appropriate user.
On the chosen team or user record, navigate to the Pump Team Settings tab.
Configuring the Quota Form#
The SMS quota form is identical for both teams and users. Complete the following fields:
Enable SMS: Set to Yes if the team or user should have access to SMS functionality.
Max Credits: Enter the number of SMS credits permitted for the team or user.
Max Credits Period: Select the period for quota renewal (Daily, Weekly, Monthly, or Annually).
Below these fields, the Credit Counter table displays:
Name: Lists users assigned to the selected team.
Credit Count: Shows how many credits each team member has used, with a total at the bottom.
Virtual Number Allocation when Allowing Replies: #
Users can choose to send an SMS from the Company, utilising a set 'From' name that does not permit a reply, or users can choose to send an SMS that permits the recipient to reply for up to 7 days using a generated virtual UK mobile number. The reply is logged as separate SMS record in Pump against Person record the reply came from.
Find out more about how this service handles replies:
How can my customers reply to my SMS messages? | TextAnywhere
Summary #
By following this guide, administrators can efficiently manage SMS quotas in Pump, ensuring controlled and secure use of SMS functionality across teams and users. Remember: assigning the Pump SMS Access Security Role is essential for enabling SMS access. For further assistance, refer to the Pump knowledgebase or contact system support.
You will be billed monthly on a consumption basis for your usage against our published SMS rates. Please speak to the Pump Support Team for pricing.